

React Testing Library (RTL) derives from best practices in software testing and builds on top of them. While Writing a good test case is crucial for any testing framework, RTL emphasizes a particular approach: it tests behavior rather than implementation.
RTL focuses on whether or not the software works the way it's supposed to; the way the code is written can change and as long as the software is behaving according to the specification the tests will still pass.
RTL finds elements by accessibility markers and not by test IDs. Accessibility markers are screen readers and other assistive technologies that would find your elements instead of test IDs. This helps in benchmarking your software as being Accessible.
While doing tests without using a browser, we need a simulated DOM, RTL makes that simulated DOM for us which helps us perform user interactions like clicking a button, etc.
RTL is generally used using either Jest or a new testing framework called Vitest. Now are you wondering what the heck are these? These are called test runners, their job is to find the test, run the test and determine whether the test has passed or failed.
We will be implementing RTL using Vitest instead of Jest. For your information, Vitest and Jest have no syntax differences. The only difference is the setups and the initial configuration and some minor differences when dealing with advanced syntax. So if you are familiar with Jest API you will find the interoperability and transition to Vitest very easy.
Check more about why Vitest is preferred. Vitest is:
- Faster
- Modern
- Cleaner integration with Vite out of the box
Test-Driven Development (TDD)
Philosophy: Write a test before you write the code.

"Tdd is a great excuse to think about the problem before you think about the solution" - Kent Beck
Why Test-Driven Development (TDD)?
- More efficient
- Makes it usable even if the underlying code is changed
- Spec-first nature
- After a major change, the test will still be there to run
Test-Driven Development (TDD) vs. Behavior-Driven Development (BDD) - where does RTL fall in this?
If “WE” only have to develop – Go TDD
If there are varied amounts of roles, stakeholders - Go for BDD
For RTL, we don’t have any explicit parameters, roles, QAs, groups, etc which BDD follows. It is developers only so TDD is the way to go.
I firmly believe that Test-Driven Development (TDD) is where RTL truly shines. TDD's core principle of writing tests before code fits perfectly with RTL's philosophy of testing components from the user's perspective.
By writing tests first, developers are forced to think about how their components will be used and interacted with, ensuring that the resulting code is both functional and user-friendly. This approach naturally leads to cleaner, more maintainable code because it prioritizes the user's experience right from the start.
Unlike BDD, which often gets bogged down in verbose specifications and stakeholder jargon. TDD with RTL is straightforward and developer-centric, allowing for rapid iteration and immediate feedback. This makes it an ideal choice for fast-paced development environments where delivering high-quality, user-focused features quickly is paramount.
RTL Philosophy
Derives from the best practices and builds on top of it.
It tests Behaviour.
Types of tests and how they work with RTL:
- Unit test - it's not mutually exclusive from functional testing, but a subset of functional testing, generally not encouraged.
- Integration tests - Not encouraged.
- Functional tests - works—RTL encourages functional tests - Robust- code not coupled tightly with the behavior.
- E2E tests - these use browser and server ( Cypress, Selenium) - RTL doesn’t support it.
RTL prioritizes finding elements by accessibility handles.
Read more about RTL Handles, here
Read about Aria Roles, here.
Working with a testing library actually makes you much more aware of accessibility rules.
Know How Blueprint of RTL Using Vitest
We focus on these two methods:
render: This method creates a simulated DOM for argument components(basically telling the test to understand what we are testing against). Further, the render method allows the simulated DOM to be accessed via the screen global object. Both render and screen are part of @testing-library/react.
expect(): Part of Vitest test runner, this asserts that we are expecting this to happen.
Ex: expect(linkElement).toBeInTheDocument().This expected method is global in both Vitest and jest. linkElement is an argument(subject of the assertion).
toBeInTheDocument is a type of matcher or the assertion with which we match things. Matchers/Assertions can also contain parameters. These assertions are what will throw an error in case not matched.
RTL Implementation For a Button Component
Let’s start simply with testing a button, all this button will do is change colors when it is clicked. We’ll be testing this as to how an end user will be using it i.e. by clicking the button and judging the interaction in our testing DOM.
We start by making an App.test file. In this file, we will be first writing out a test case (remember the TDD way - write the test first and make functionality later).
Here we have, the code snippet to test out button functionality,
import { render, screen, fireEvent } from "@testing-library/react"
import App from "./App"
// Testing a button that will change color on click along with its text
test("button that will change color on click along with its text", () => {
//render the app
render(<App />)
//find the button
const buttonElement = screen.getByRole("button", { name: /blue/i })
//check inital color
expect(buttonElement).toHaveClass("red")
//click the button
fireEvent.click(buttonElement)
//check the buttontext
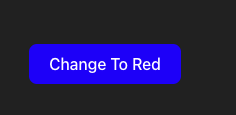
expect(buttonElement).toHaveTextContent(/red/i)
//check the button color
expect(buttonElement).toHaveClass("blue")
// or you can use expect(buttonElement).toHaveStyle({"background-color":"rgb(0,0,255"})
})Let’s break down the different components of the above code snippet:
1. Rendering the App Component:
You start by rendering the App component using
render(<App />)This sets up the component for testing.
2. Finding the Button Element:
Next, you locate the button element using
screen.getByRole("button", { name: /blue/i })This query searches for a button with the name containing the word “blue”.
3. Checking Initial Color:
You verify the initial color of the button using
expect(buttonElement).toHaveClass("red")This assertion ensures that the button starts with the CSS class “red”.
Partner with Us for Success
Experience seamless collaboration and exceptional results.
4. Simulating a Click Event:
You simulate a click on the button using
fireEvent.click(buttonElement)This triggers any associated event handlers.
5. Checking Updated Text:
After the click, you check the updated button text using
expect(buttonElement).toHaveTextContent(/red/i)This ensures that the button text now contains the word “red”.
6. Checking Button Color After Click:
Finally, you verify that the button color has changed to blue using
expect(buttonElement).toHaveClass("blue")Now with our test case written, we move on to coding the component according to the above requirement;
.red { background-color:red; }
.blue{ background-color:blue; }
import React, { MouseEvent } from 'react';
import './app.css'
type ColorCode = "red" | "blue"
const App = () => {
const [buttonColor, setButtonColor] = React.useState<ColorCode>("red")
const handleOnClick = (e: MouseEvent<HTMLButtonElement>): void => {
setButtonColor((buttonColor) => buttonColor === "red" ? "blue" : buttonColor === "blue" ? "red" : buttonColor)
}
return (
<div>
<button className={buttonColor} onClick={handleOnClick}>{buttonColor === "blue" ? "change to red" : "change to blue"}</button>
</div>
);
}
export default App;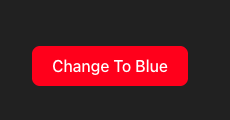
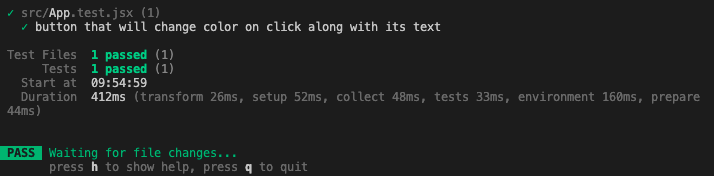
On running the npm test command on our terminal, we see our test ran and passed successfully;
Before moving on, please note that the Vitest is compatible with both Chai and Jest so one can use either of their dom matcher API to build conditions i.e chai.use or expect.extend API.
Let’s now veer into something that explains a fuller application of RTL;
Testing Login Logout flow
Here we will write a login logout flow test component and its testcase. So, as described above we will follow the TDD way ( write the test case first -> Let the test fail -> write the component in accordance with the test cases writer earlier -> Now test the component and see if it passed all the test cases). Let’s get digging!
Login component flow:
- The component will contain a Login state indicator, a checkbox for terms & Conditions and a Sign In/Sign Out button.
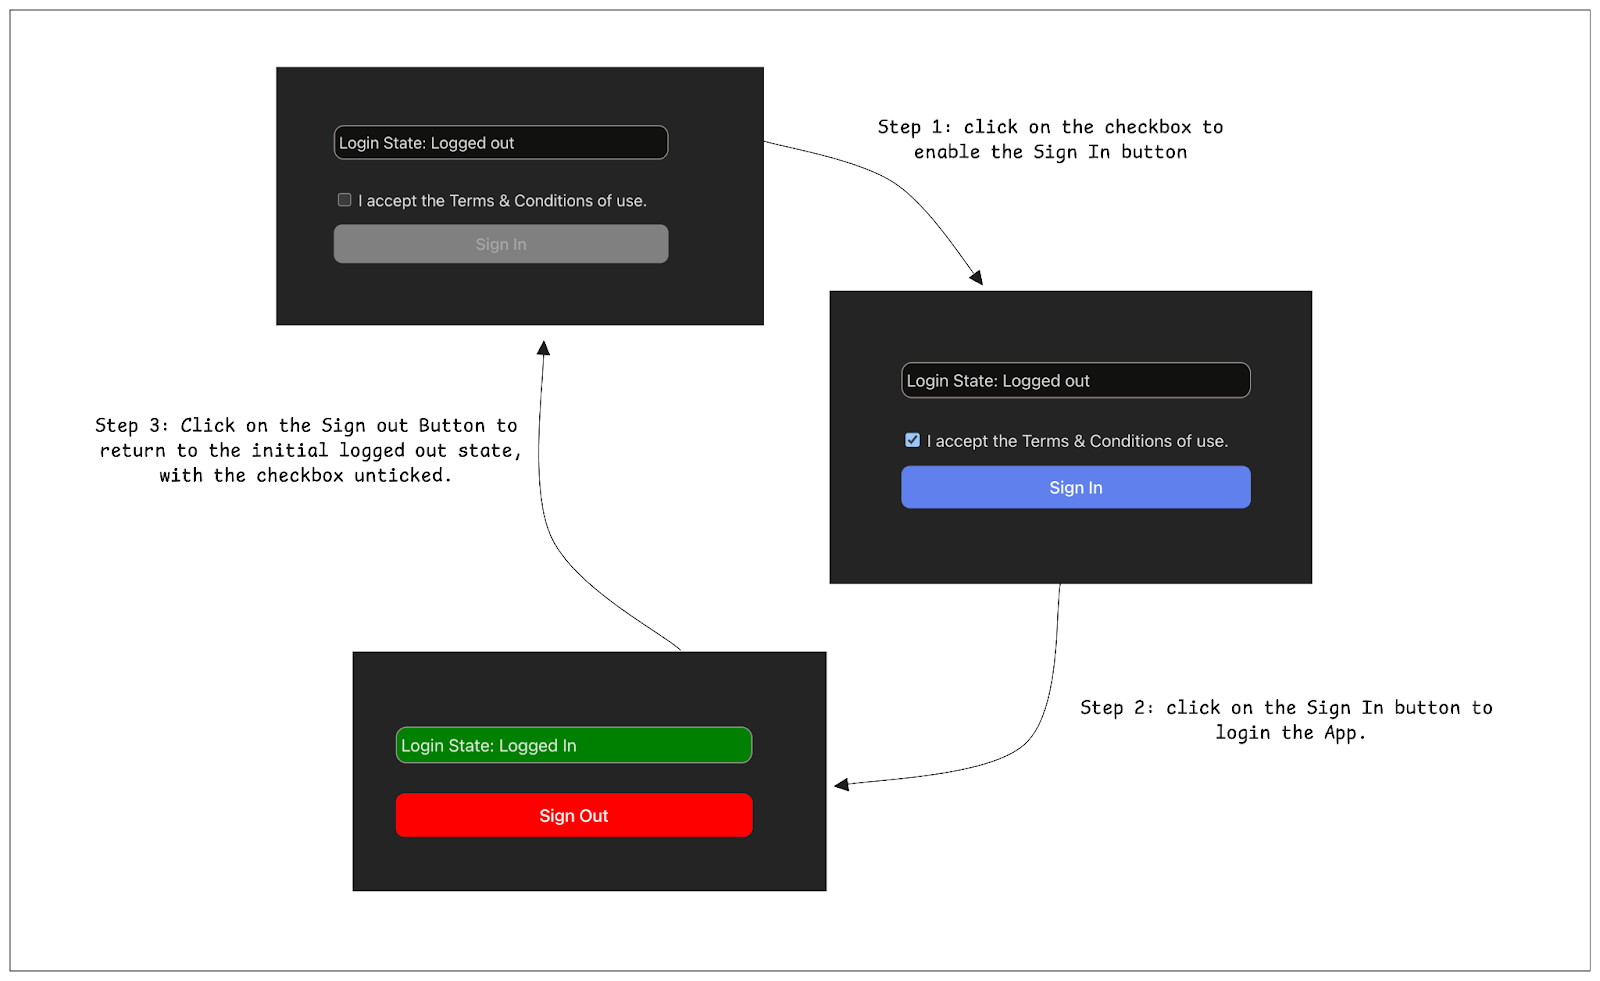
We make a test file, that covers the flow from the user's point of view:
test("test for login logout flow", async () => {
 render(<App />)

 // Find the button and checkbox elements
 const buttonElement = screen.getByRole("button", { name: /sign/i })
 const checkBoxElement = screen.getByRole("checkbox")

 /* Verify initial states */
 // 1. Check if the portal status label is present and it says "Logged out"
 expect(screen.getByText(/Logged out/i)).toBeInTheDocument()
 // 2. Check if the button is disabled
 expect(buttonElement).toBeDisabled()
 // 3. Check if the checkbox is unchecked
 expect(checkBoxElement).not.toBeChecked()

 /* Test the flow */
 // 1. Click the checkbox to enable the button
 fireEvent.click(checkBoxElement)
 // 2. Check if the button is enabled
 expect(buttonElement).toBeEnabled()
 // 3. Click the button to login
 fireEvent.click(buttonElement)
 // 4. Check if the portal status label is present and it says "Logged in"
 await waitFor(() => {
   expect(screen.getByText(/Logged in/i)).toBeInTheDocument()
 })
 // 5. Click the button to logout
 fireEvent.click(buttonElement)
 // 6. Check if the portal status label is present and it says "Logged out"
 await waitFor(() => {
   expect(screen.getByText(/Logged out/i)).toBeInTheDocument()
 })
 // 7. Click the checkbox to enable the button
 await waitFor(() => {
   // find the checkbox & check if it is unticked
   const checkBoxElement1 = screen.getByRole("checkbox")
   expect(checkBoxElement1).not.toBeChecked()
   // check if button is disabled
   expect(buttonElement).toBeDisabled()
   // click to tick the checkbox
   fireEvent.click(checkBoxElement1)
 })
 // check if button is now enabled
 expect(buttonElement).toBeEnabled()
})
Note: We use fireEvent to simulate user interactions and waitFor to handle asynchronous updates to the DOM, ensuring that all expected states are checked at the appropriate times.
Breakdown of The Above Snippet
1. Render the Component:
1. The App component is rendered using render(<App />).
2. Find Elements:
1. The button element is found using
screen.getByRole("button", { name: /sign/i })2. The checkbox element is found using
screen.getByRole("checkbox")3. Verify Initial States:
1. Portal Status: Check if the portal status label is present and says "Logged out" using
expect(screen.getByText(/Logged out/i)).toBeInTheDocument()2 Button State: Check if the button is disabled using
expect(buttonElement).toBeDisabled()3. Checkbox State: Check if the checkbox is unchecked using
expect(checkBoxElement).not.toBeChecked()4. Test the Flow:
1. Enable Button:
1. Click the checkbox to enable the button using
fireEvent.click(checkBoxElement)2. Check if the button is enabled using
expect(buttonElement).toBeEnabled()2. Login:
- Click the button to log in using
fireEvent.click(buttonElement)- Wait for the portal status label to change to "Logged in" using
await waitFor(() => { expect(screen.getByText(/Logged in/i)).toBeInTheDocument() })3. Logout:
- Click the button to log out using
fireEvent.click(buttonElement)- Wait for the portal status label to change to "Logged out" using
await waitFor(() => { expect(screen.getByText(/Logged out/i)).toBeInTheDocument() })4. Re-enable Button:
- Wait for the checkbox to be unticked and the button to be disabled using
await waitFor(() => { const checkBoxElement1 = screen.getByRole("checkbox"); expect(checkBoxElement1).not.toBeChecked(); expect(buttonElement).toBeDisabled(); fireEvent.click(checkBoxElement1); })- Check if the button is enabled using
expect(buttonElement).toBeEnabled()Let’s now make an empty component, App.tsx. And, now we run the above test against it.

Obviously, our test will fail now. This in essence covers what TDD philosophy says, move from red flag 🔴 (failing the test) to green flag 🟢 (passing the test).
Let’s now make our App component and green flag 🟢 (pass the test).
import React, { MouseEvent, ChangeEvent } from 'react';
type ColorCode = "red" | "blue"
const App = () => {
 const [buttonColor, setButtonColor] = React.useState<ColorCode>("blue")
 const [checkValue, setCheckValue] = React.useState<boolean>(false)

 const handleOnClick = (e: MouseEvent<HTMLButtonElement>): void => {
   if (buttonColor === "red") {
     setCheckValue((checkValue) => !checkValue)
   }
   setButtonColor((buttonColor) => buttonColor === "red" ? "blue" : buttonColor === "blue" ? "red" : buttonColor)
   e.currentTarget.blur()
 }
 const handleCheckBox = (e: ChangeEvent<HTMLInputElement>): void => {
   if (buttonColor === 'red') {
     setButtonColor("blue")
   }
   setCheckValue((checkValue) => !checkValue)
 }
 return (
   <div className="container">
     <p className={`portal-label ${buttonColor === "red" ? 'logged-in-label' : "logged-out-label"}`}>Login State: {buttonColor === "red" ? "Logged In" : "Logged out"}</p>
     {buttonColor !== 'red' ?
       <div>
         <input type="checkbox" id='checkbox' onChange={handleCheckBox} name="checkbox" checked={checkValue} />  <label htmlFor='checkbox'>I accept the Terms & Conditions of use.</label>
       </div>
       : null}
     <button disabled={!checkValue} className={buttonColor} onClick={handleOnClick}>{buttonColor === "red" ? "Sign Out" : "Sign In"}</button>
   </div>
 )}
export default App;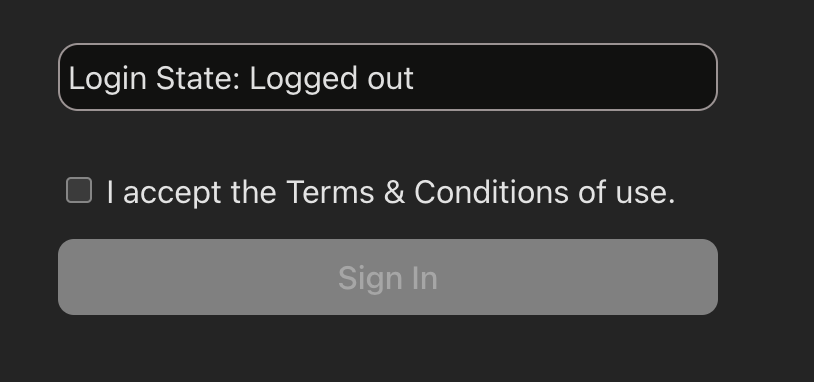
Summary of the Above Snippet:
This above component toggles between a "logged in" and "logged out" state, represented by the button state and the checkbox state.
- An element displays the login state based on whether one is logged in or not.
- If not logged in a checkbox and its label are rendered.
- The login button is disabled if the checkbox is not checked.
Partner with Us for Success
Experience seamless collaboration and exceptional results.
Let's now run the test using the npm test.
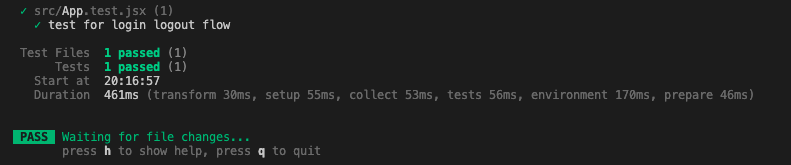
Voila! Our tests passed.
Functional is Great But What if I Want to Perform Unit Tests
As we know RTL focuses on behavior and hence underpins functional testing methodology but what if we have a case where we would like to do Unit testing?
In that case, we can still use RTL but now we would skew our mental model into a boxed mindset where now the components no longer are the sole representation of the behavior but we have functions which can range from being helper functions, common functions, complex functions, etc that need standalone testing.
Generally, we do Unit testing:
- When we have common helper functions.
- Functional tests sometimes are set in stone, so any refactoring of the underlying code can make the test case fail and become useless. Here, Unit testing can help deliver both in terms of ease of adding a test case and being an independent test without tanking our original functional test case.
- When we have to test standalone, independent functions.
- When we have a lot of edge cases, we just need to make sure all those edge cases are tested in a boxed independent manner.
- Sometimes we have complex components whose state is determined by some function outside its component periphery and if the functional test fails we can narrow it down by unit testing the function that is responsible for changing its state or where its business logic resides.
PSA: For Complex functions, unit test smaller functions first, get them passed and then only do a functional test to identify the issues easily. This will help you avoid spiralling down into a cycle of bitterness and self-loathing!
Testing Server Response using RTL
Wherever we are testing our app we would be dealing with data coming from a server, this is also a significant part of behavior testing. Let's dig into what this entails w.r.t RTL.
For this, we will make a test case which renders a mock data component that makes a request to an actual server endpoint.
Our test case will cover:
1. Initial State: This verifies that the component shows a loading state initially.
2. Data Fetching: This will wait for the component to fetch and display data.
3 Final State: This will verify that the fetched data is displayed correctly.
Our DataFetcher test file is below,
import React from "react"
import { render, screen, waitFor } from "@testing-library/react"
import { vi } from "vitest"
import DataComponent from "./DataComponent"

global.fetch = vi.fn(() =>
 Promise.resolve({
  json: () => Promise.resolve({ data: "Mocked Data" }),
})
)
describe("DataFetcher", () => {
 it("displays loading initially and then fetched data", async () => {
   console.log("Rendering DataComponent...")
   render(<DataComponent />)

   console.log("Checking if 'Loading...' is displayed...")
   expect(screen.getByText("Loading...")).toBeInTheDocument()

   console.log("Waiting for the data to be fetched and displayed...")
   await waitFor(() => {
     console.log("Checking if 'Fetched Data' is displayed...")
     expect(screen.getByText("Fetched Data")).toBeInTheDocument()
   })

   console.log("Checking if 'Mocked Data' is displayed...")
   expect(screen.getByText("Mocked Data")).toBeInTheDocument()
 })
})
Our Simple Data Fetcher react component file
import React, { useState, useEffect } from 'react';
const DataComponent: React.FC = () => {
   const [data, setData] = useState<string | null>(null);
   const [loading, setLoading] = useState<boolean>(true);

   useEffect(() => {
       const fetchData = async () => {
           try {
               const response = await fetch('https://jsonplaceholder.typicode.com/todos/1');
               const result = await response.json();
               setData(result.data);
           } catch (error) {
               console.error('Error fetching data:', error);
           } finally {
               setLoading(false);
           }
       };
       fetchData();
   }, []);

   if (loading) {
       return <div>Loading...</div>;
   }

   return (
   <div>
       <h1>Fetched Data</h1>
       <p>{data}</p>
   </div>
   );
};

export default DataComponent;
Now, Let’s run the test against this component using npm test command.

The test passed.
This way of testing is fine for testing smaller apps but for larger and more complex apps or a case where we don’t want an actual backend server, there we would want to use something called Mock Service Workers.
Mock Service Workers (MSW) are tools used to intercept and mock network requests in web applications. They provide a way to simulate server responses without needing an actual backend server. This is particularly useful for testing, development, and debugging at scale. MSWs are very helpful to:
- Intercept Network Requests: MSW can intercept various types of network requests (e.g., fetch, XMLHttpRequest) and provide mock responses.
- Define Request Handlers: You can define handlers for different types of requests (e.g., GET, POST) and specify the responses they should return.
- Browser and Node.js Support: MSW can be used both in browser environments (using Service Workers) and in Node.js environments (using a request interception library).
- Realistic Mocking: MSW allows you to create realistic mock responses, including status codes, headers, and response bodies.
- Seamless Integration: It integrates seamlessly with testing libraries like Jest, React Testing Library, and others.
In this discussion of mocks, there is this polarizing topic i.e., the discussion of why not use Sinon, jest or other mocks v/s why we need to test using mock service workers.
Ground Rule: for simple apps, mocking could work, but MSW provides lots of tools for more complicated apps.
Best Practices for Writing a Good Test Case
- Test User Interactions and Behavior: Focus on testing how users interact with your application rather than implementation details.
// Good: Testing user interaction
fireEvent.click(screen.getByText('Submit'));
expect(screen.getByText('Thank you!')).toBeInTheDocument();- Use Queries that Reflect User Actions: Prefer queries that resemble how users interact with the app, such as getByRole, getByLabelText, getByPlaceholderText, etc.
- Avoid Testing Implementation Details: Avoid testing internal component states or methods. Focus on the output and behavior that users can see and interact with.
// Bad: Testing implementation details
expect(component.state('isOpen')).toBe(true);

// Good: Testing behavior
expect(screen.getByText('Modal Content')).toBeInTheDocument();- Use screen for Queries: Use the screen object for queries to avoid the need to pass around the container object and to make your tests more readable.
- Clean Up After Each Test: RTL automatically cleans up the DOM after each test, but it's good practice to ensure your tests do not rely on side effects from previous tests.
- Write Readable and Maintainable Tests: Keep your tests simple and readable. Write clear and concise tests with descriptive names and avoid complex logic within your tests. Use comments to explain complex logic if necessary.
// Good: Simple and readable test
test('displays a thank you message after form submission', () => {
 render(<MyComponent />);
 fireEvent.click(screen.getByText('Submit'));
 expect(screen.getByText('Thank you!')).toBeInTheDocument();
});
- Test Accessibility: Ensure your components are accessible by using queries like getByRole and checking for accessible names and roles.
// Good: Testing for accessibility
const submitButton = screen.getByRole('button', { name: /submit/i });
expect(submitButton).toBeInTheDocument();
My Final Words
React Testing Library (RTL) has revolutionized the way we approach testing in React applications. By emphasizing user-centric testing practices, RTL ensures that our tests are more reliable, maintainable, and reflective of real-world usage. Its API is intuitive and encourages best practices, making it easier for developers to write meaningful tests that focus on what the user experiences rather than the implementation details.
As we continue to build complex and interactive web applications. React Testing Library, with its focus on accessibility and user interactions, provides a powerful toolset to achieve this goal. By adopting RTL, developers can ensure that their applications are not only functional but also provide a seamless and accessible experience for all users.
Side-Note
Over the past few years, Vitest has become the fastest-growing test framework in the JavaScript world, with millions of downloads each week. While being the default test runner for Vite certainly helps its popularity, Vitest stands out on its own merits. It provides a modern alternative to Jest that is faster, easier to configure, and still uses the familiar Jest API.
Vitest 2.0 continues this trend with a major new feature called Browser Mode, which brings a fresh approach to component testing with features like No more “fake DOM”, Unified Tooling and bridging the gap and being in this sweet spot between e2e testing and unit testing. As a newsletter remarked,“ it’s a Vite world, and we’re all just living in it ”.
Suggested Reads- Test Environment in Software Testing
Frequently Asked Questions
1. How does React Testing Library (RTL) differ from other testing frameworks?
RTL focuses on testing user interactions and behavior rather than implementation details. It uses accessibility markers to find elements, making tests more robust and encouraging accessible component design.
2. What is the benefit of using Test-Driven Development (TDD) with RTL?
TDD with RTL involves writing tests before code, ensuring components meet user needs from the start. This approach leads to more maintainable code and helps developers focus on creating user-friendly features.
3. How can developers test server responses using RTL?
RTL can test server responses by mocking fetch requests. For more complex scenarios, developers can use Mock Service Workers (MSW) to intercept and simulate network requests without needing an actual backend server.


Ritwik
Web Developer, cricket and finance enthusiast.


